Marketplace
This tutorial demonstrates how to build a marketplace using Python microservices and a VueJS Web App. The goal is to showcase the ease of setting up an application network with Bondy, where components communicate using RPC and Publish/Subscribe.
Objective
In this tutorial, we will build a marketplace where individuals can buy and sell items.
The objective is to showcase how fast and simple it is to set up an application network with Bondy. In this network, all components communicate using RPC and Publish/Subscribe.
Marketplace Architecture
Domain Model
The demo models the following actors:
- Marketplace
The place where sellers and buyers congregate to exchange goods.
- Seller
A seller sells an item at a given starting price for a given period of time, i.e. people can bid on the item until it times out.
There are 2 possible outcomes once the end of the sell period is reached:
- There were no bids, the item just expired. No deal happened.
- There was at least one bid higher than the initial price. The higher bidder wins. We have a deal.
- Buyer
A buyer tries to buy an item by bidding until the sell period ends.
- Bid
An offer (a certain price) for an item listed on the marketplace. Only bids higher than the current highest price are accepted.
Technical View
The architecture design of the example application is depicted in the following diagram.
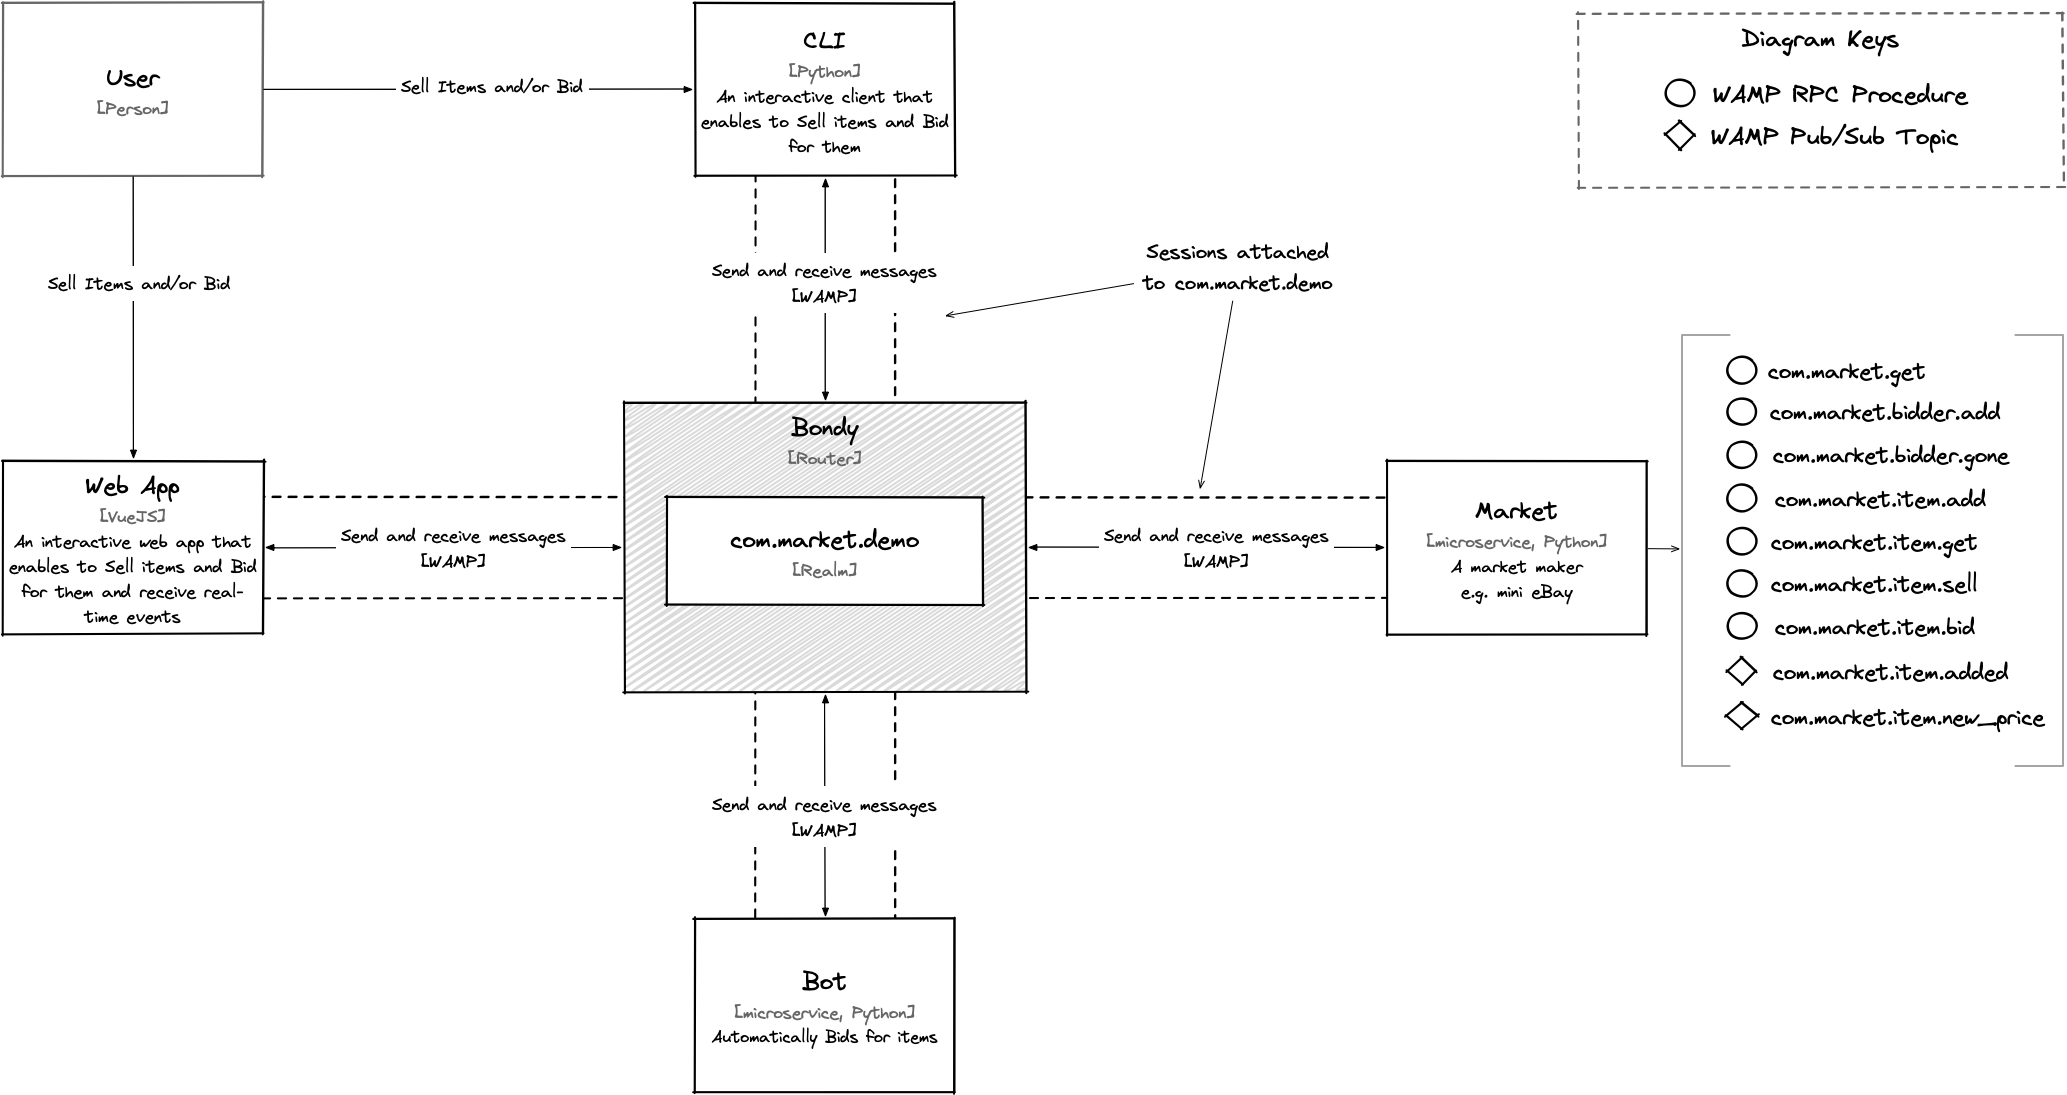
The diagram shows the following components:
- Market
A Python microservice implementing a simple marketplace.
Uses AutobahnPython, WAMP client to open a session on
com.example.demorealm in Bondy and registers the WAMP procedures URIs (RPCs) the Web App and Bot instances will use to sell and buy goods.- Bot
A Python microservice that creates named bots (via its CLI). Once a bot is created it will automatically bid for items.
Uses AutobahnPython
Configuration
The demo spawns 5 bots that are configured to:
- Bid on any items whose prices are lower than a given limit,
- Increasing the price by a given amount
- Taking a given amount of time to perform the bid, i.e. lag between computing the price and actually bidding. We use this lag is to have some bids from the bots rejected and slow down the demo to a more human friendly rhythm.
- Web App
A single page Web App written in Javascript. Uses using VueJS and AutobahnJS (Browser).
- Interactive CLI
An interactive command line interface written in Python and using the Autobahn Python WAMP client.
All components open a single WAMP session to Bondy on the com.market.demo realm.
Steps
Requirements
- Docker (Docker Desktop in case you use macOS or Windows)
gitmake
Make sure that Docker is running before you start.
Clone the Demo repository
$ git clone https://github.com/bondy-io/bondy-demo-marketplace.gitBuild and run the Demo
The following command uses Docker compose to download and/or build the images for the components mentioned before.
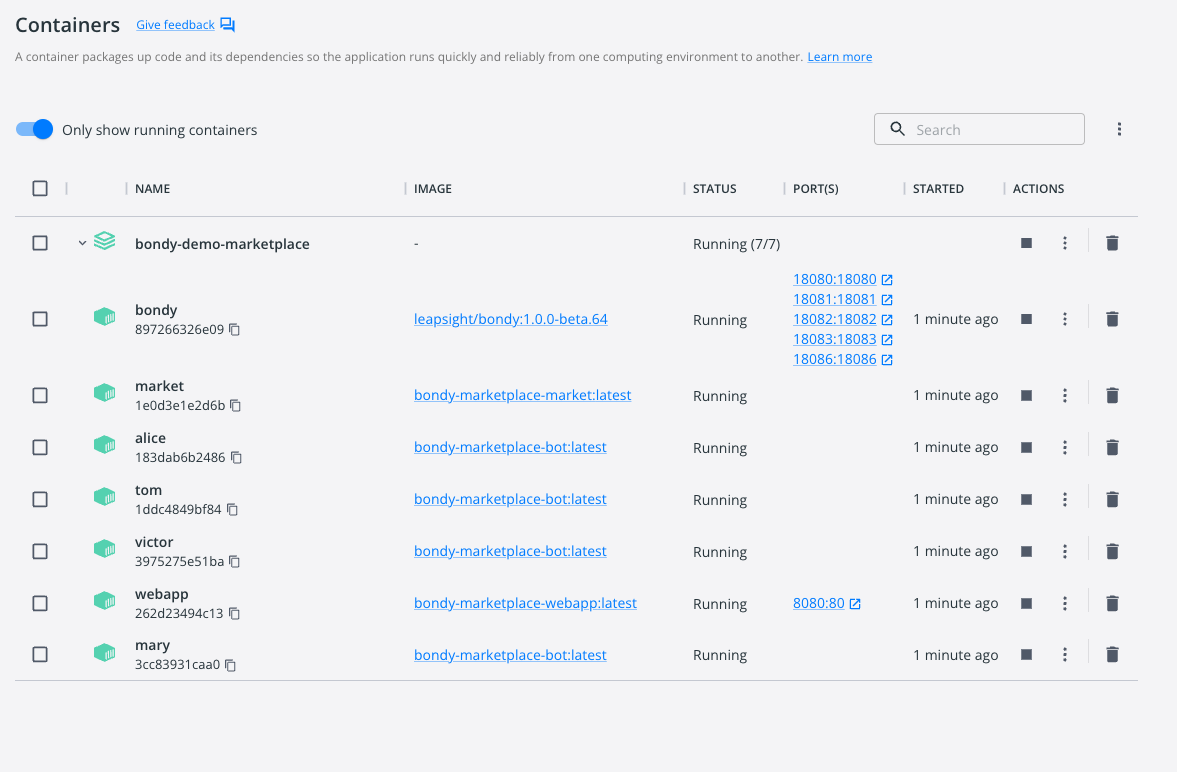
$ makeThis will result in the following Docker containers:
- 1 instance of Bondy
- 1 instance of the Marketplace Web App
- 1 instance of the Market service
- 4 instances of the Bot service, each one ready to bid (with names
alice,tom,victorandmary)
Note
Bondy needs a few seconds to start and be ready to accept connections, this is because Bondy is validating and indexing the internal database. This can actualle be controlled via configuration.
From the Docker containers' logs you might notice microservices are trying to reconnect with logs like the following, do not worry, they will keep on retrying to connect to Bondy.
2022-11-07T15:37:51 Connection failed with OS error:
    ConnectionRefusedError: [Errno 111] Connect call
    failed ('192.168.16.2', 18080)
2022-11-07T15:37:51 trying transport 0 ("ws://bondy:18080/ws")
using connect delay 2.2569295356372576Join the marketplace
To sell an item and see the bots competing, just open the Web App from a browser pointing at http://localhost:8080.
Note
Again, since Bondy needs a few seconds to start, you may notice the Web App spinning (Loading... Please wait) before successfully connecting and printing No items to show.
Once the web app has loaded, click the button with user icon (top right corner) to setup yourself up as a market participant.
You should see something similar to the following screen capture:
The screen capture shows the market docker instance log window below the web app, you might want to do the same and open the logs to see what is going on, although the Web App will print all events as well.
Sell one or more items
Using the Web App again, click on the SELL ITEM button to sell an item.
Enter the following information (as shown in the screen capture below):
- the name of the item e.g. Apple,
- the initial price e.g. 0.5,
- the number of minutes before the deal closes e.g. 2
In the following example we add an item called apple. You can repeat this operation multiple times to add several items.
Notice that once we enter the item the app receives a notification (Publish/Subscribe event) shown in the green banner below.
See the bots bidding for your items
Once you click on Save, you'll see the bots starting to compete for the item, placing bids, unless your initial price is too high, i.e. more than $10,000.
You should see something similar to the capture below:
Under the hood
Now let see how this was done and what is happening.
Market
Connection to Bondy
The connection to bondy is performed through a component that requires a fairly light configuration. This component uses AutobahnPython, the WAMP client.
The client will handle the WAMP protocol interactions and let us focus on the business logic.
See the source code for the connection here.
class Market:
  def __init__(self):
    ab_component_config = create_autobahn_component_config(user_id="market")
    self._component = Component(**ab_component_config)
self._component.on("join", self._on_join)In line 3 we call a util function that returns the following dictionary:
{
    "realm": "com.market.demo",
    "transports": [
        {
            "type": "websocket",
            "url": "ws://localhost:18080/ws",
            "serializers": ["json"]
        }
    ],
    "authentication": {
        "cryptosign": {
            "authid": "market",
            "privkey": PRIVATE_KEY
        }
    }
}This tells Autobahn to open a websocket session with Bondy attached to the com.market.demo realm and using WAMP Cryptosign authentication.
Note
The com.market.demo realm is configured by the Make target responsible to running the Bondy docker instance.
RPC Registration
Once connected, the _on_join method is called with the established session.
The market registers 6 RPCs under the following URIs:
Once it has established a session to Bondy the com.example.demo realm, registers the following RPCs.
com.market.bidder.add- Add a user as biddercom.market.bidder.gone- Remove a user as biddercom.market.get- List all the items for salecom.market.item.bid- Place a bid on a listed itemcom.market.item.get- Return an item's detailscom.market.item.sell- List a new item for sale.
A registration is performed by simply calling the register method on the session object giving the callback function and the procedure URI.
For example:
See the source code for the registrations here.
def _on_join(self, session, details):
  session.register(self._get_items, "com.market.get")
...Publications
Once the marketplace is connected and ready to accept items and bids, it has to notify all the other components connected to the same realm about certain events.
The market will publishe events under the following WAMP topics (Publish/Subscribe):
com.market.opened- When market is connected and has registered the RPC URIs, it publishes this topic to let the listeners it is ready to accept calls.com.market.item.added- When a new item is on offer.com.market.item.expired- When an item times out without any bids.com.market.item.new_price- When a bid was accepted.com.market.item.sold- When an item times out with a winner.
This is performed by calling the session's object publish method.
In the following example no arguments are needed since the event has no payload, but some can be provided in a more general case.
See the source code for the publications here.
def _on_join(self, session, details):
    ...
    # MARKET_OPENED resolves to "com.market.opened"
session.publish(MARKET_OPENED)Web App
The Web App subscribes to several topics and calls the WAMP procedures on the market to perform actions like the ones you've done already: add a new participant and sell and item.
You can also bid for item using the item button at the end of the row.
Bots
Similarly the bots connect to Bondy with their own private crytpsign key. However, upon successful connections, the bots will only subscribe to the com.market.opened topic and wait until the marketplace is open before trying to bid on items.
The subscription is simply done by calling subscribe on the session:
See the source code for the bots here.
def _on_join(self, session, details):
session.subscribe(self._on_market_opening, "com.market.opened")Once the marketplace is open, the bots will perform several important tasks, including:
- Join the marketplace by identifying themselves.
- Making a call to
com.market.bidder.add
- Making a call to
- Query the marketplace for all currently available items
- Making a call to
com.market.get - Making a call to
com.market.item.get
- Making a call to
- bid on any item that are under $10,000.
- Making a call to
com.market.item.bid
- Making a call to
- Subscribe to
com.market.item.addedto be notified every time a new item is on sale. - Subscribe to
com.market.item.new_priceto be notified every time there is a new big on an item.
Making an RPC call is done by calling the call method on the session object.
For instance when the bot Alice joins the marketplace, it calls:
await session.call("com.market.bidder.add", "Alice")Note
This is an asynchronous call because the bot has to know if the call was successful and it was accepted in the marketplace. Similarly, bidders have to wait for the bid to return to know if it was accepted or rejected.
For more...
The snippets here were simplified to keep the tutorial simple but for the full picture and more detail, please have a look at the code at the GitHub bondy-demo-marketplace repo.